2025 New Vietnam E-Visa Application Guide: Official website, fees & tips you need to know before apply
Not sure which is the official website for applying for a Vietnam e-visa? Or confused by some of the questions during the application process and don’t know how to fill them out?
Having successfully applied for a Vietnam e-visa myself, and entered and exited Vietnam without any issues — I’ve created this detailed step-by-step guide to help you apply for a Vietnam e-visa on your own, so you can skip the visa agency and save some money.
- Hanoi travel guide: must-try food, attractions, Itinerary & currency tips
- Halong Bay day tour review & travel tips: cruise, kayaking & cave exploration
- 10 aesthetic & cultural things to do in Hoi An, Vietnam (central Vietnam)
- 11 aesthetic and cultural things to do in Ho Chi Minh City
- Sapa travel tips: tourist traps to avoid, how to get to Sapa from hanoi & itinerary suggestion
- Vietnam Hoi An coconut boat: essential guide to avoid overpaying
- Vietnam sleeper bus review & survival tips (Sapa route)
Vietnam e-visa fee
The fee for a single-entry Vietnam e-visa is 25 USD, and 50 USD if you need a multiple-entry visa.
If your trip to Vietnam is a one-time entry, meaning you won’t need to re-enter Vietnam after exiting, then you only need to apply for a single-entry e-visa. However, if your itinerary requires multiple entries into Vietnam (for example, after exploring nearby countries), you will need to apply for a multiple-entry e-visa.
Whether it’s a single or multiple entry, the cost for the Vietnam e-visa is much cheaper compared to the previous visa. Plus, you can handle the entire process on your own now, without needing to go through an agency — it’s really convenient!
What you need to prepare before applying Vietnam e-visa
- A digital copy of your passport’s info page: you can simply take a clear photo of your passport’s info page using a good-quality phone and upload it. Just make sure the entire page is visible in the photo. Important reminder: Your passport must be valid for at least six months on the day you enter Vietnam — be sure to double-check this in advance!
- A digital copy of your ID photo: according to the official requirements, the photo you upload for your e-visa application must be recently taken, 4×6 cm in size, in JPG or JPEG format, smaller than 2MB, a front-facing portrait (with no hat and no glasses), taken against a white background, clear and in focus.
- Credit card: once you’ve filled out the online application, you will need to pay the e-visa fee with your credit card to finish the process.
- Information of the booked flight tickets/ferry tickets/bus tickets/hotel: you will need to book your flights/ferries/bus tickets in advance because the Vietnam e-visa application requires information about your confirmed dates of entry and exit, as well as the entry and exit points — meaning where you will enter and leave the country. Booking your first night’s hotel is also important, as you will need to provide a local address for your stay in Vietnam, and you can provide the address of your hotel for it.
Vietnam e-visa official website
I used to apply Vietnam e-visa via this official website.
However, since 11 November, 2024, the official website for applying Vietnam e-visa has changed to 🔗https://evisa.gov.vn/ or 🔗https://thithucdientu.gov.vn/
The new Vietnam e-visa official websites now provide clearer application instructions and run more smoothly, making the entire process easier.
How long does it take to get a Vietnam e-visa?
According to the official website, you’ll receive your e-visa result within 3 to 15 working days (excluding weekends and public holidays).
In my case, I applied on September 11 and received my nearly one-month visa in just four days, by September 15.
Step-by-step Vietnam e-visa application guide
Applying for the Vietnam e-visa on your own isn’t hard — I hope the step-by-step guide below can make it easy for you to get it done smoothly!
Step 1. entering the Vietnam e-visa official website
There are 2 official websites for applying for a Vietnam e-visa, you can choose either 🔗https://evisa.gov.vn/ or 🔗https://thithucdientu.gov.vn/ both work and operated by the Vietnam Immigration Department.
It is important to note that since 11 November 2024, these two websites are the only official Vietnam e-visa portals, and they are the main platforms for submitting your application and checking e-visa results online.
Step 2. switch to English version
Click the British flag in the top right corner to switch to English.
Step 3. click ”Apply Now”

Just click apply now to start the application processes if you are foreigners outside Vietnam.
Step 4. read Declaration Instructions
Read and tick the box to ”Confirm compliance with Vietnamese laws upon entry“ and “Confirmation of reading carefully instructions and having completed application”.
This section also lists the official entry and exit points allowed for the Vietnam e-visa, so make sure to acknowledge them before booking your flight, ferry, or bus tickets!
Step 5. upload the digital copy of your passport’s info page & your ID photo
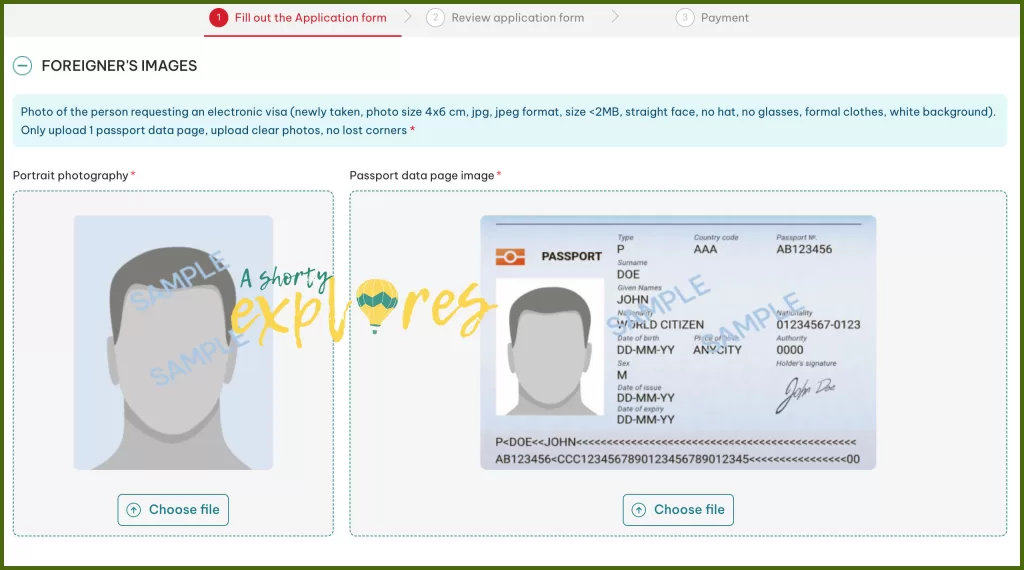
Make sure both your passport and ID photo are either in JPG or JPEG format and under 2MB. And your ID photo needs to be 4×6 cm in size.
(These details are explained clearly in the earlier section of this article, under “What You Need to Prepare for the Vietnam E-Visa Application.
Step 6. fill out 8 main sections in the application form
There are total 8 main sections in the Vietnam e-visa application form for you to fill out, these are Personal Information, Requested Information, Passport Information, Contact Information, Occupation, Information about the trip, Trip’s Expenses, Insurance and if needed then also -Accompany Child/Children under 14 years old who are issued with the same passport request to be issued the same e-Visa.
Detailed tips & instructions are as below.
1. Personal Information
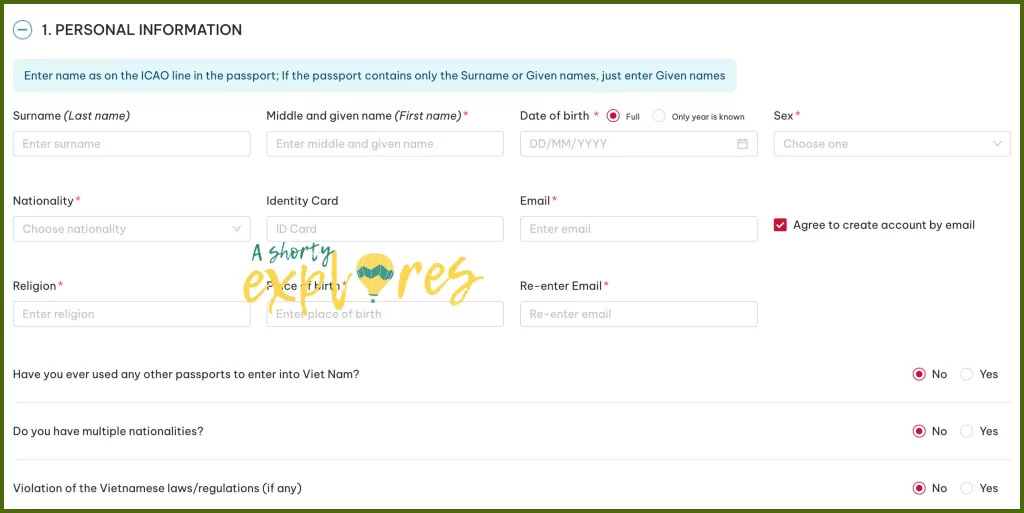
- When filling out the middle and given name (First name), don’t use a hyphen (“-”) to separate it — just use a space instead.
- Identity Card: fill in your national identity card number — but since this field doesn’t have a red asterisk (*), it’s optional and you can leave it blank.
- Email: provide your primary email address (as the confirmation email will be sent there).
- Religion: if you don’t have one, just type “none”.
- Place of birth: provide the information exactly as it appears on your passport information page.
- Answer the three questions with “yes” for correct or “no” for incorrect (just answer honestly).
2. Requested Information

- To issue e-visa for: Single-entry or Multiple-entry: choose your Vietnam e-visa type based on whether you will be entering the country once or multiple times. Since Vietnam shares borders with Laos, Thailand, and Cambodia, many travelers like to explore nearby countries as part of a Southeast Asia trip — in that case, a multiple-entry visa can be a good option. (The total Vietnam e-visa fee you will need to pay at the end will depend on this choice).
- Grant Evisa valid from (DD/MM/YYYY): simply enter the date you plan to arrive in Vietnam (same as the arrival date to Vietnam on your flight/train/bus tickets).
- To (DD/MM/YYYY): just enter the actual date you plan to leave Vietnam — or give yourself a few extra days, in case you decide to stay longer. Though, make sure the dates you enter are still within the valid application range. When I received my Vietnam e-visa, the start and end dates matched exactly what I required in the application. (I stayed in Vietnam for 9 days, but I set the visa duration to about a month, just to be flexible).
3. Passport Information
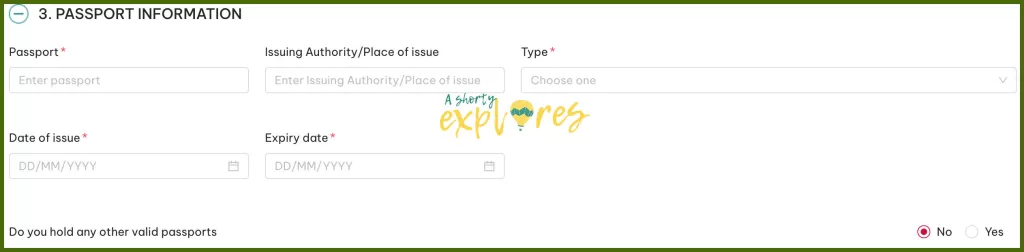
- Passport: be sure to enter the passport number exactly as shown on your latest passport.
- Issuing Authority/Place of issue: also enter the information exactly shown on your latest passport.
- Type: unless you hold a diplomatic or official passport, otherwise regular travelers like us should simply select “Ordinary Passport.”
- Date of issue: enter the information exactly shown on your latest passport.
- Expiry date: enter the information exactly shown on your latest passport.
4. Contact Information
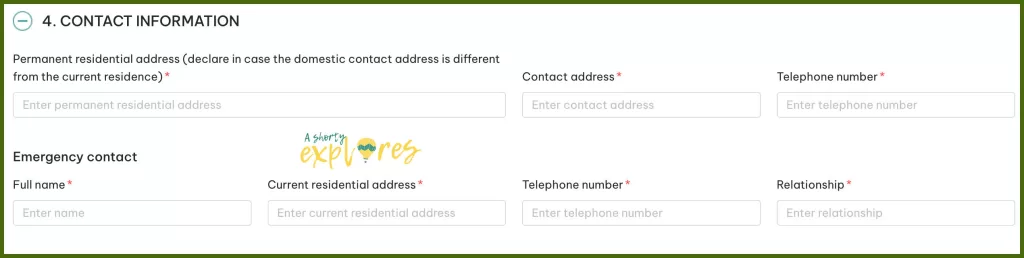
- Telephone number: you can provide your phone number from your home country, but don’t forget to include the country code.
- For the emergency contact section, just provide information about someone close to you.
- Relationship: refers to how your emergency contact is related to you. Here are some common examples you can use: father, mother, brother, sister, husband / wife, son / daughter, cousin, uncle / aunt.
5. Occupation

When applying for a Vietnam e-visa, the occupation field on the form isn’t marked with a red asterisk (*), so it’s up to you whether you want to fill it out or leave it blank.
6. Information about the trip
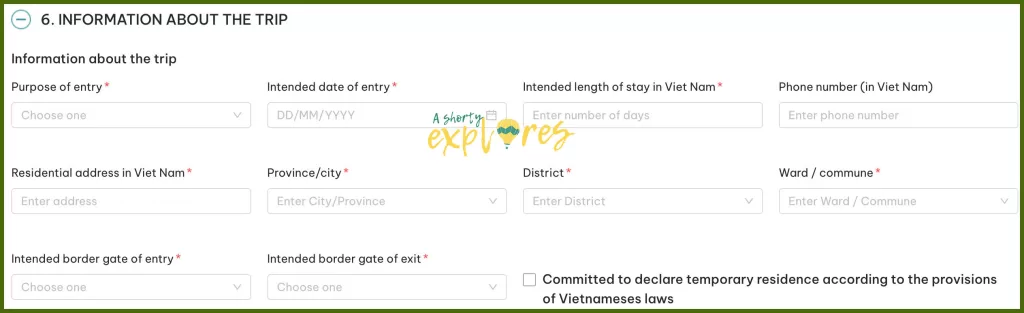
- Purpose of entry: if you are going to Vietnam purely for traveling, then just choose “Tourism” as answer.
- Intended date of entry (DD/MM/YYYY): provide the date of arrival in Vietnam as shown on your flight, train, ferry or bus ticket.
- Intended length of stay in Vietnam: simply enter the actual length of your stay. For example, I stayed in Vietnam for 9 days, so I entered 9 days.
- Phone number (in Vietnam): if you’re using your home country’s number for roaming, just enter your phone number. Alternatively, if you already have a Vietnamese number, use that. Otherwise, you can simply enter the phone number of the hotel where you will be staying.
- Residential address in Vietnam: just provide the hotel address.
- Province/city: enter the city and province of the hotel where you plan to stay while in Vietnam.
- District: check the hotel address to find out which district it is located in the city.
- Ward / commune: also check the address of the hotel for it.
Use this hotel address as an example: 2-4 Đường số 10, An Phú, Thủ Đức, Hồ Chí Minh
“Hồ Chí Minh” is the city/province; ”Thủ Đức” is district; ”An Phú” is ward/commune.
- Intended border gate of entry: Vietnam allows entry by sea, land, and air. Choose the entry point based on your travel plans. If you’re flying, select the airport you’ll be arriving at. If you’re entering by land, choose the border crossing you’ll be using. Be sure to double-check this before filling it out — if the entry point on your visa doesn’t match your actual arrival location, you might not be allowed to enter!
- Intended border gate of exit: same as above, you will need to fill out the entry point that’s the same as your flight/ferry/bus/train tickets.
Answer the three questions with “yes” for correct or “no” for incorrect.

- Agency/Organization/Individual that the applicant plans to contact when enter into Viet Nam? -If you’re just going to Vietnam for travel, you can just select “No.”
- Have you been to Viet Nam in the last 01 year? -simply answer truthfully
- Do you have relatives who currently reside in Viet Nam? -simply answer truthfully.
7. Accompany Child/Children under 14 years old who are issued with the same passport request to be issued the same e-Visa (if any)
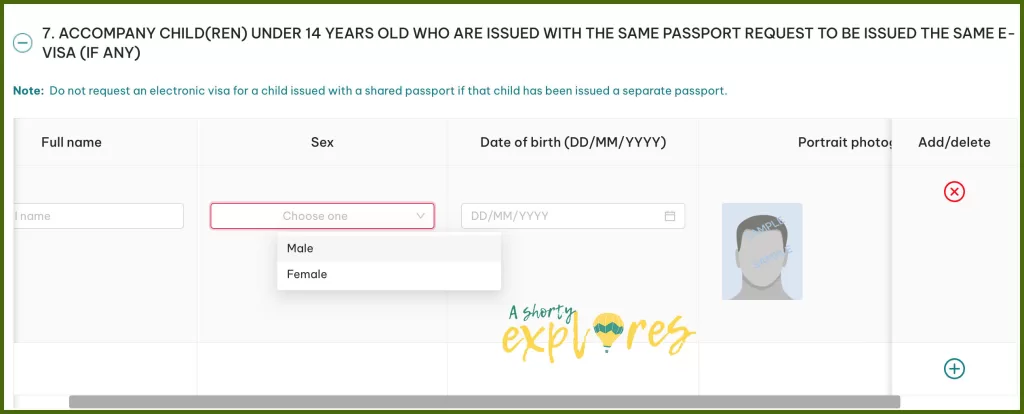
If this doesn’t apply to you, you don’t need to fill it out.
If it does, you will need to provide the children’s full name, gender, date of birth, and upload a 4×6 cm passport-style photo (with the same requirements as yours).
I personally do not have to fill this out, so I am not entirely sure. If you have questions about it and need help, you can reach out to the Vietnam Immigration Department at [email protected].
8. Trip’s Expenses & Insurance

- Intended expenses (in USD): just be honest about how much you might spend in Vietnam.
- Did you buy insurance? -either you do or not both ok. But I’d definitely recommend getting travel insurance. I always make sure to have it when I travel.
- Who will cover the trip’s expenses of the applicant? -the options include “Applicant” and “Other agency/organization/individual. If you are covering your own travel expenses and not using a visa agency or having someone else pay for you, just select “The applicant.”
Step 7. review and confirm the information you’ve filled out
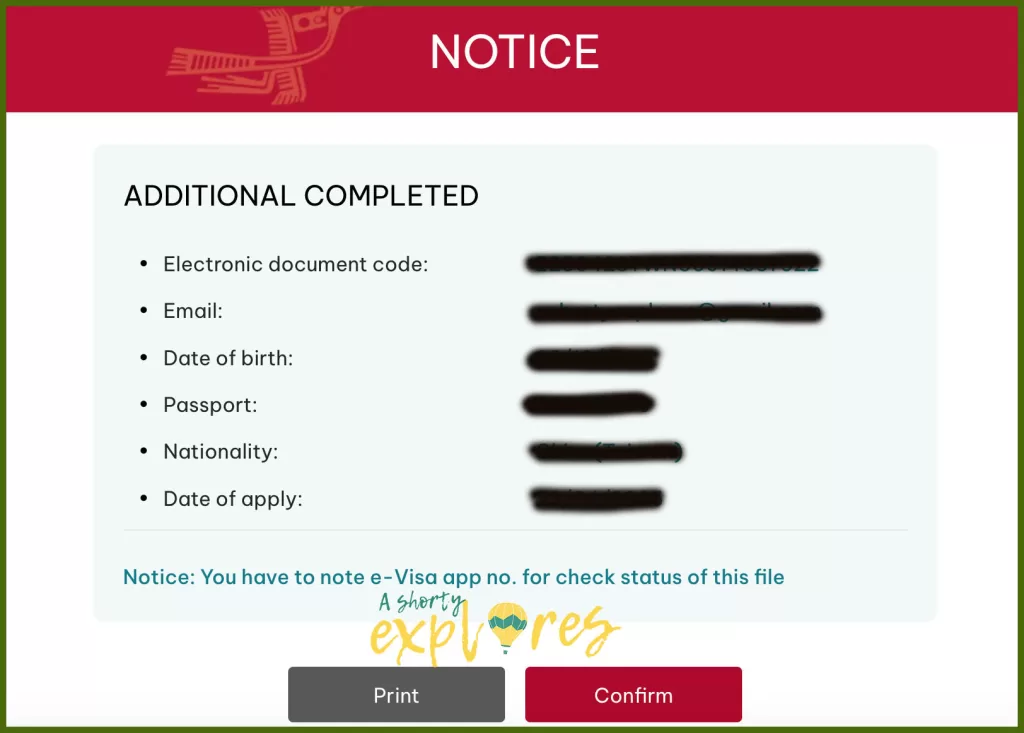
Next, you will see a confirmation page like above. Be sure to take a screenshot or photo and remember your application ID — It will also be sent to your primary email, and you will need it to check the status and result of your visa application later on.
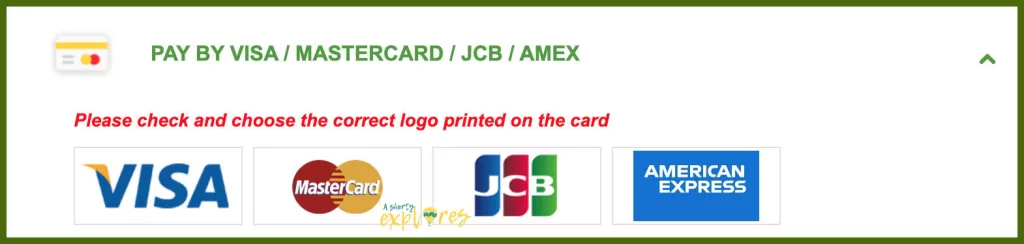
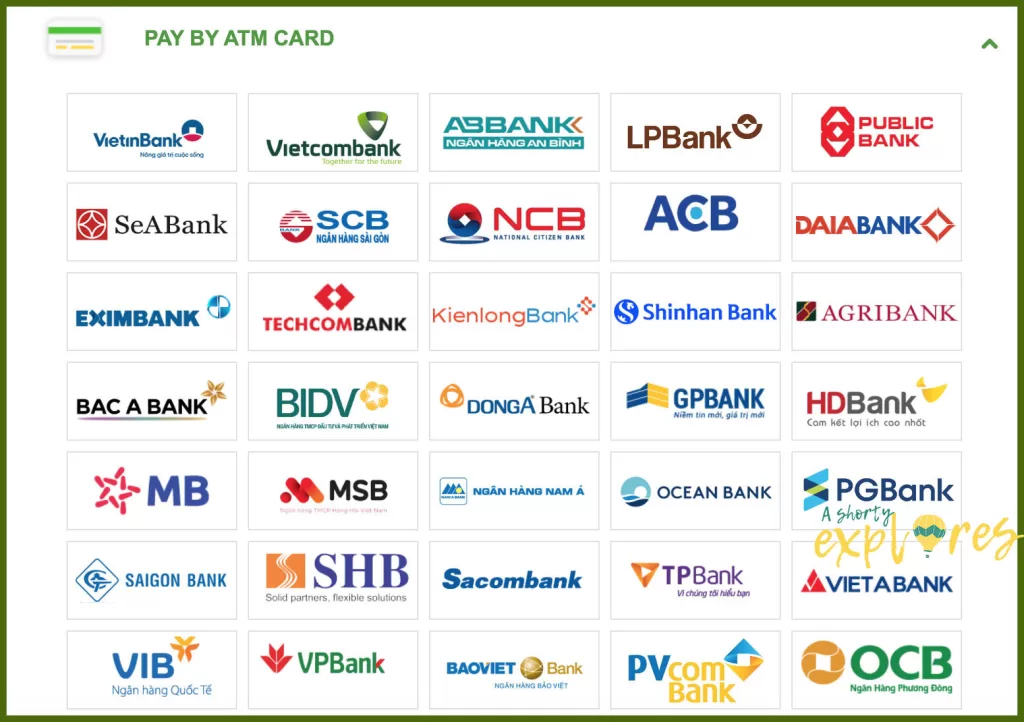
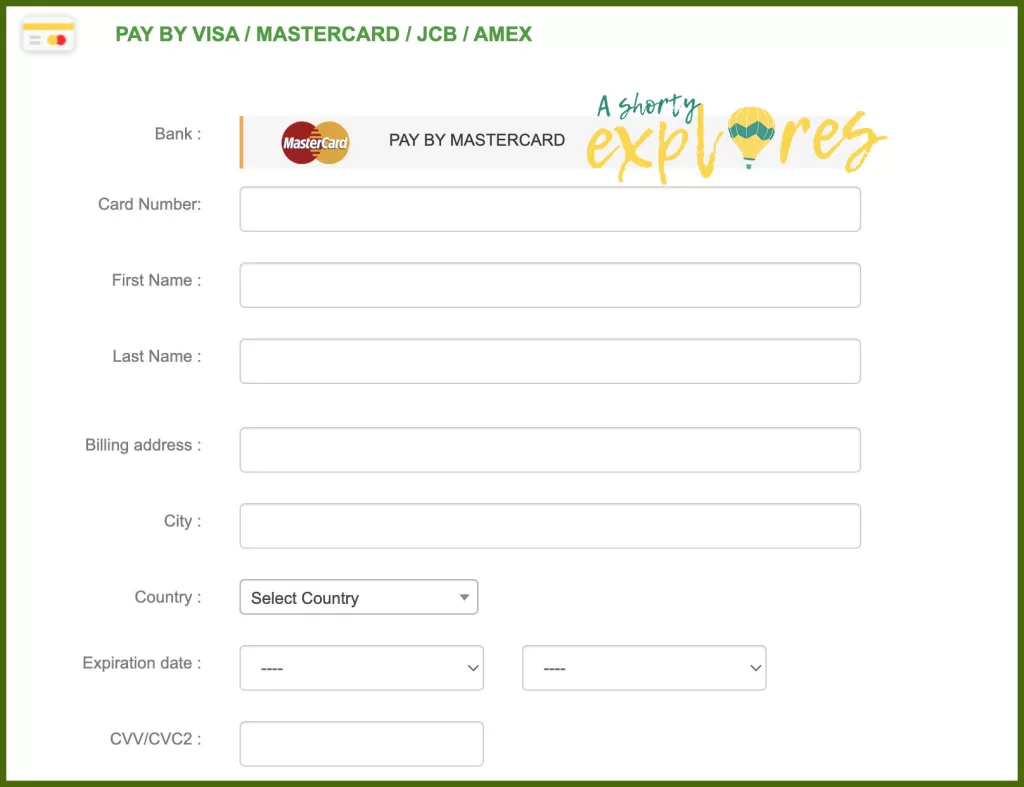
Step 8. Complete the payment
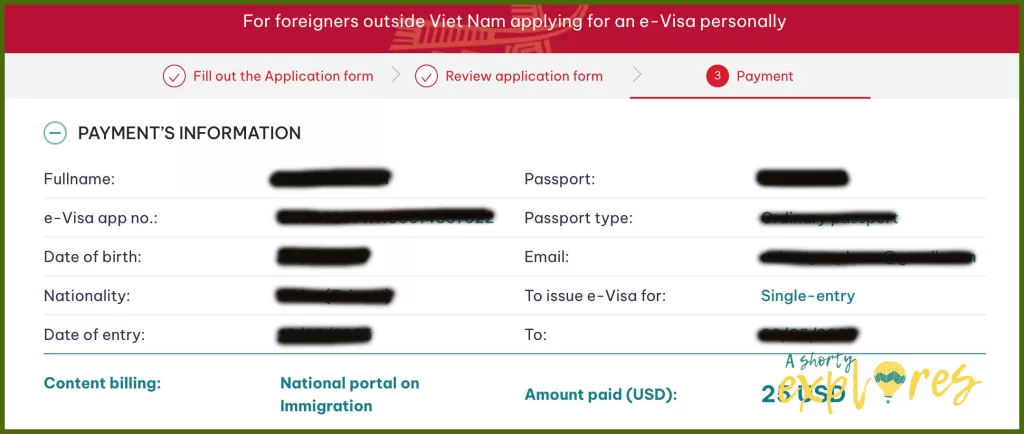
After clicking “Confirm,” the system will take you to a page where you can review your information one last time and see the total fee.
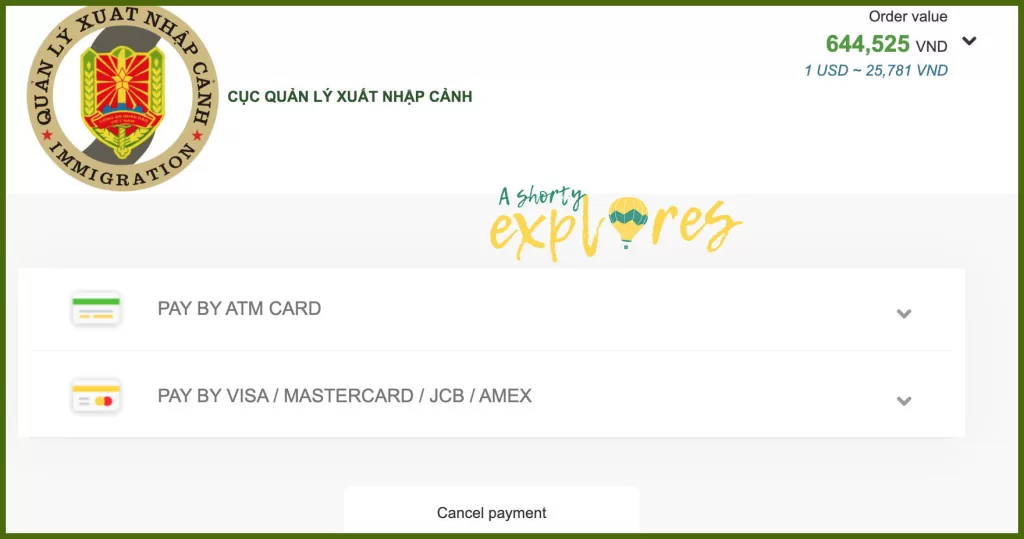
Then, click “Proceed to Payment,” and you will be given two options — you can pay using a debit card or credit card.
Step 9. check the Vietnam e-visa status and result
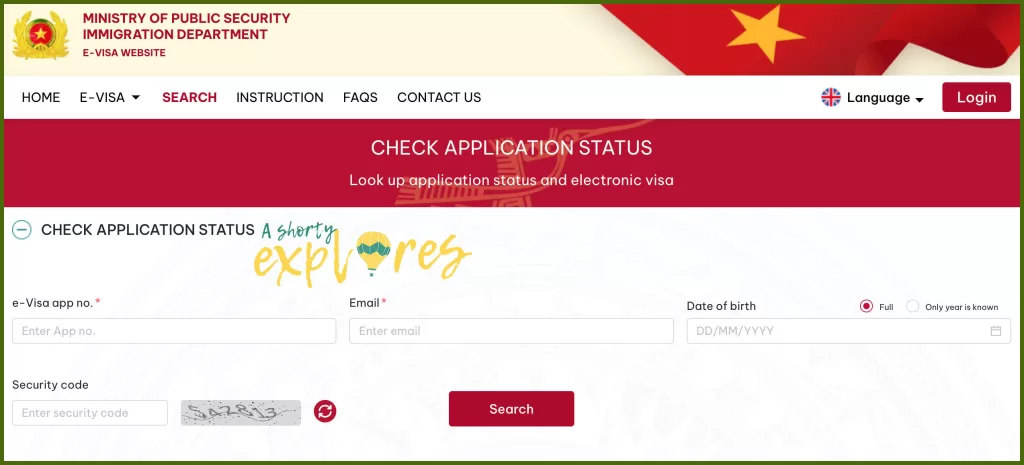
Typically, you will get the result within 3 to 15 days.
You can check your application status, view the result, and download your visa here: 🔗https://evisa.gov.vn/e-visa/search.
Just enter your Application ID, the email address you used when applying, and your date of birth.
Step 10. print your Vietnam e-visa
If you are wondering whether you need to print out your Vietnam e-visa, the answer is yes.
Once your e-visa is approved, make sure to download and print a hard copy! Airlines will check it on the day of your flight, and it will also be required when you enter Vietnam.

Wishing you success with your visa application and have an amazing time in Vietnam!


You May Also Like

Hanoi Food Guide: 5 must-try food in Hanoi & authentic restaurants to eat
Is the Vietnam Mekong Delta Day Tour Worth It? Honest Review & Travel Tips